Authentication and Authorization with Auth0 and Sinatra
 I recently gave a quick talk called Authentication and Authorization with Auth0 and Sinatra: A Case Study at Geneva.rb, Geneva’s very own Ruby meetup. This post is a text version of that talk.
 The talk was about how we at Faveeo implemented user authentication and authorization with Auth0 and a Sinatra application in our new product Horizons. I decided to give this talk and share it here because I think it’s an interesting and unusual setup that is worth sharing with others and to see what comments we can get.
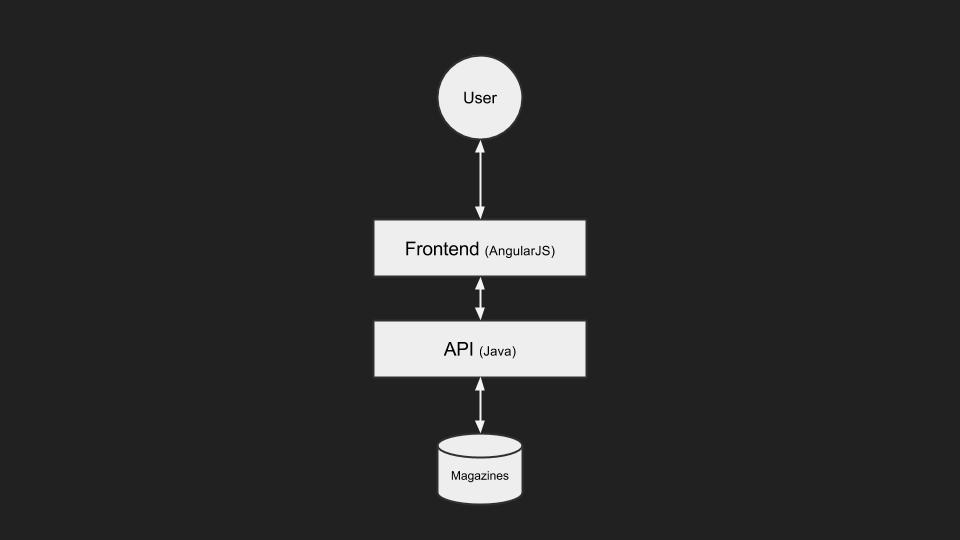 We started with a very simple application composed of a frontend application written in AngularJS that communicates with a backend API written in Java which has access to a database of magazines.
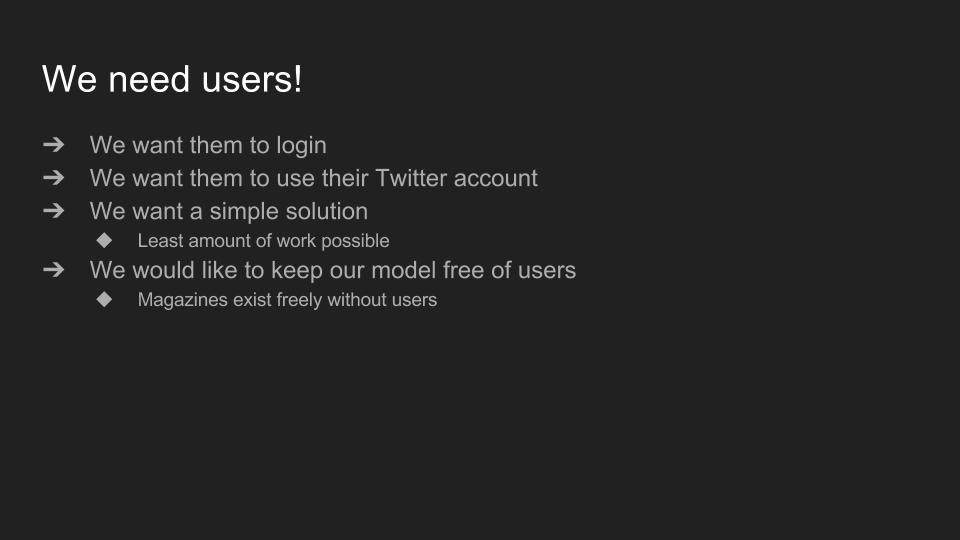 But of course we needed more. In particular we needed users. And we wanted those users to be able to login through their Twitter account. And because at Faveeo we’re a small team, we were looking for something simple and easy to implement. We were also looking to keep our models oblivious of users. A magazine does not need an owner to exist.
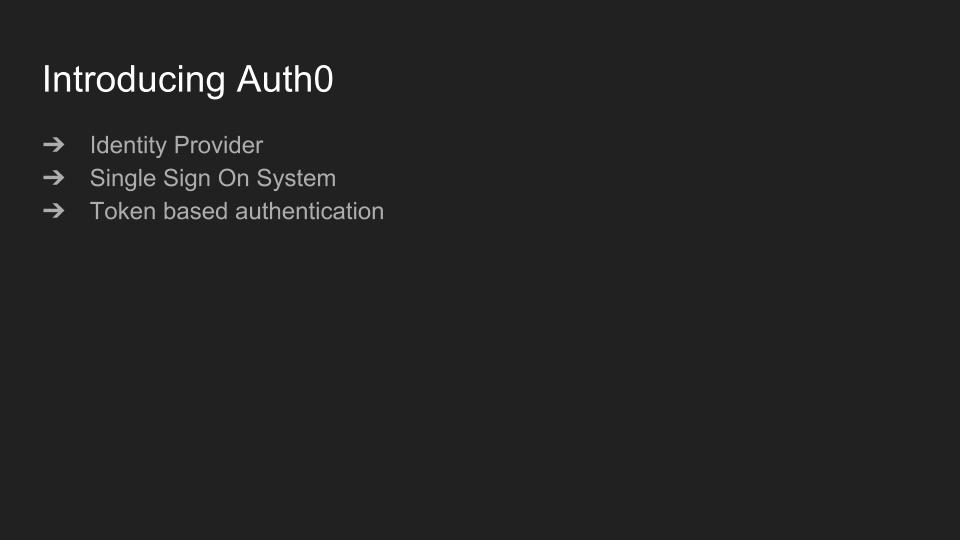 That’s when we found Auth0. They are essentially a single point of integration for several identity providers. It’s really easy to implement a single sign on system and user authentication works by using signed tokens issued by Auth0.
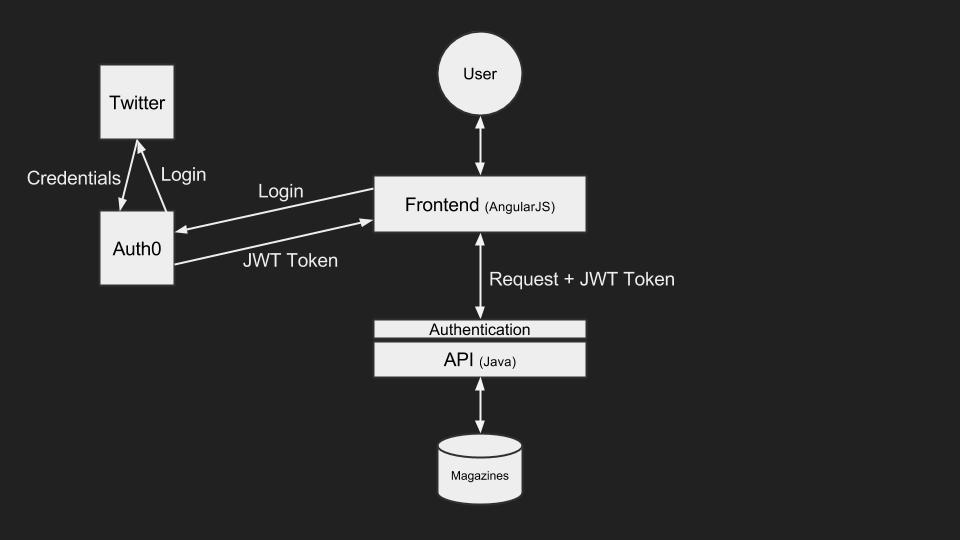 To authenticate users with their Twitter login we had to integrate Auth0 into our frontend application and we had to implement a thin authentication layer in front of our API, which simply validates the issued tokens a blocks any invalid requests. This is how it looks like.
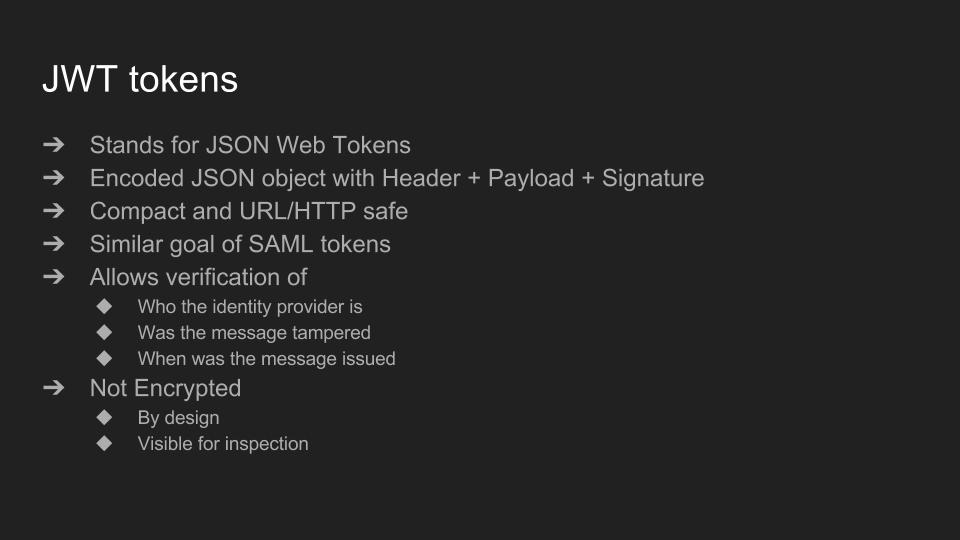 These Auth0 issued tokens are in fact called JWT tokens. JWT stands for JSON Web Tokens and are part of a bigger set of standards currently on the draft stage of becoming an IETF standard.
These tokens are similar in spirit to SAML tokens, but are instead JSON objects, composed of a header, payload and signature which are then encoded in base 64.
Auth0 has created a very good website explaining what JWT tokens are and showing their structure. I highly recommend you to check it out. jwt.io
These Auth0 issued tokens are in fact called JWT tokens. JWT stands for JSON Web Tokens and are part of a bigger set of standards currently on the draft stage of becoming an IETF standard.
These tokens are similar in spirit to SAML tokens, but are instead JSON objects, composed of a header, payload and signature which are then encoded in base 64.
Auth0 has created a very good website explaining what JWT tokens are and showing their structure. I highly recommend you to check it out. jwt.io
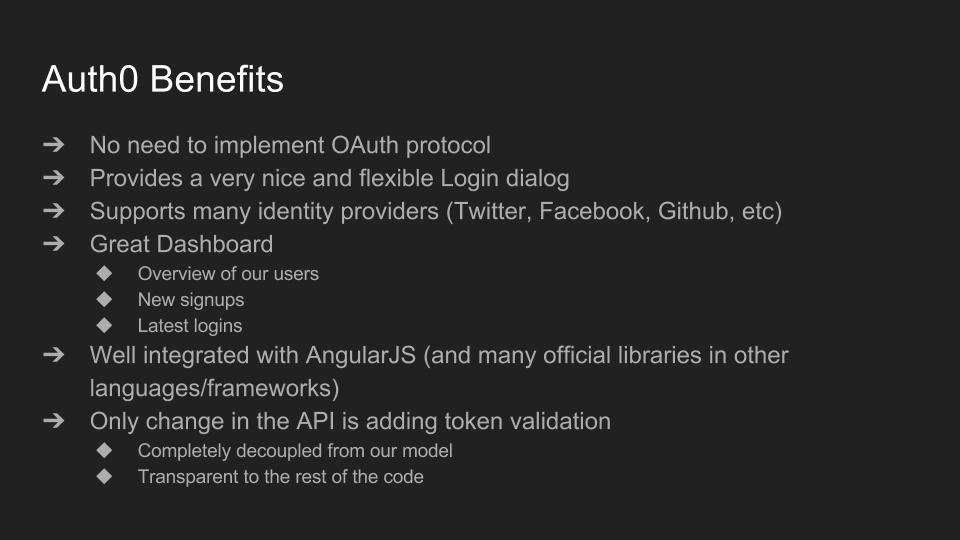 Using Auth0 has many benefits that are important to us. The ability to use any OAuth identity provider without having to actually deal with the OAuth protocol is obviously a big one. Other nice things are the great login and AngularJS libraries they provide and the Auth0 dashboard that gives us a good overview of our users.
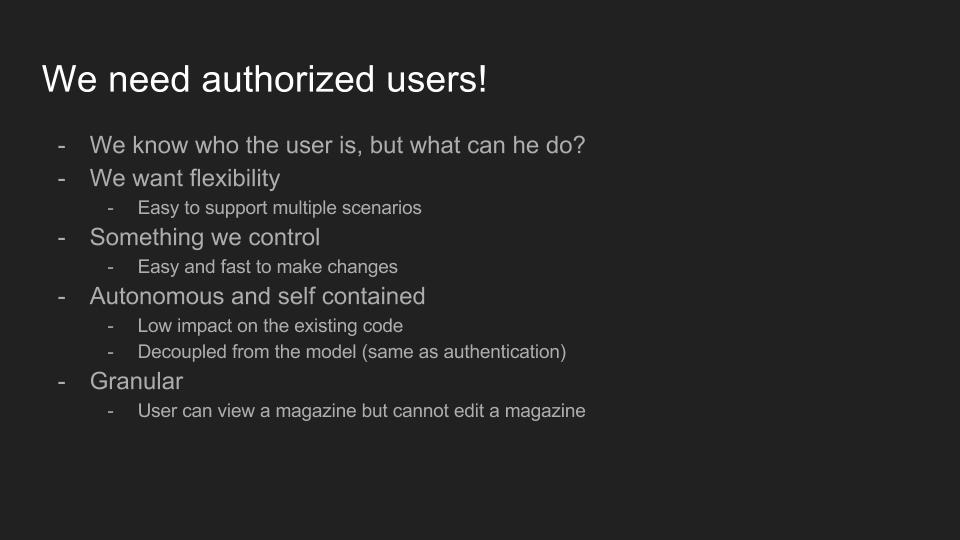 Now that we had authenticated users, we needed to go one step further and be able to authorize them to access certain resources. We were again looking for something simple and quick to integrate but also flexible and granular to be able to support more complex scenarios. We also wanted it to be decoupled and external to our existing code.
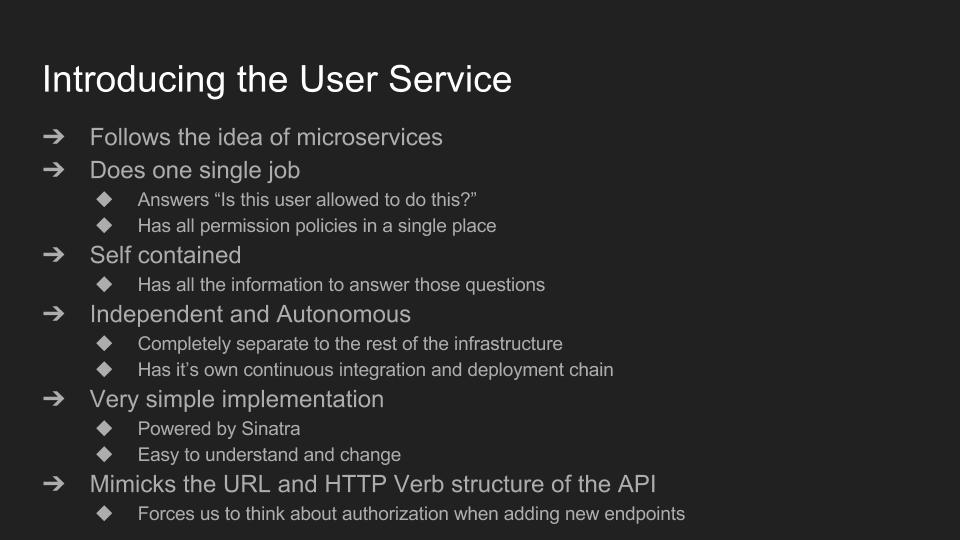 We decided to see what this whole microservices hype is all about and build our own authorization microservice that we called the user service. It has one single job - knowing if a user is allowed to do a specific action. The idea was to have it separate from the existing code and infrastructure and with it’s own continuous integration and deployment chain.
One of the reasons we decided to build our own service was because we knew we would be able to implement it quickly and easily with tools like Sinatra and Padrino.
To implement this service we looked at how the user interacts with the frontend application and how the frontend interacts with the backend API. There’s pretty much a one-to-one match between a user action and an API call. Knowing that, we decided to take our API’s url and HTTP verb structure and implement an identical API just answering authorization requests.
We decided to see what this whole microservices hype is all about and build our own authorization microservice that we called the user service. It has one single job - knowing if a user is allowed to do a specific action. The idea was to have it separate from the existing code and infrastructure and with it’s own continuous integration and deployment chain.
One of the reasons we decided to build our own service was because we knew we would be able to implement it quickly and easily with tools like Sinatra and Padrino.
To implement this service we looked at how the user interacts with the frontend application and how the frontend interacts with the backend API. There’s pretty much a one-to-one match between a user action and an API call. Knowing that, we decided to take our API’s url and HTTP verb structure and implement an identical API just answering authorization requests.
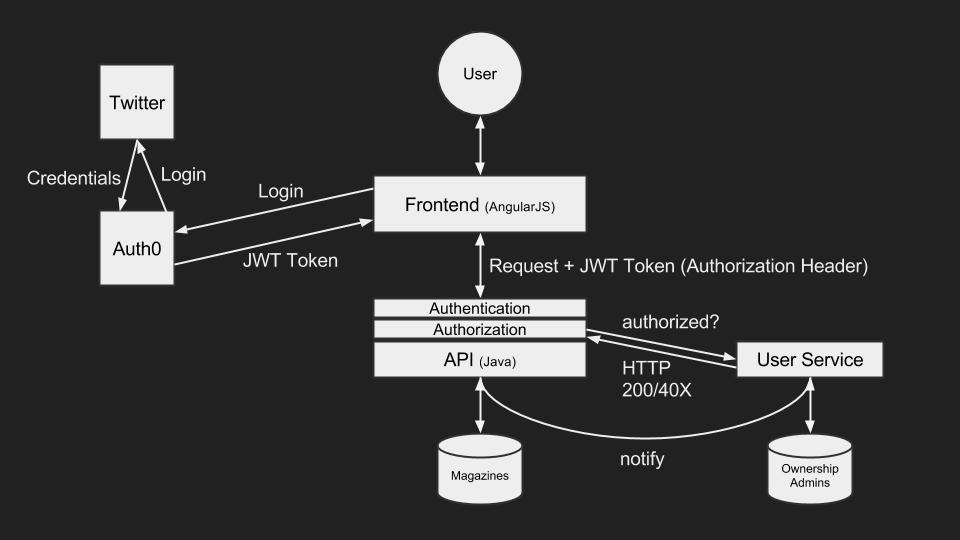 Similar to our authentication implementation, we now have a thin authorization layer sitting infront of our API. This new layer is responsible for asking the user service if a certain user is authorized to do a certain task, which the service responds simply with HTTP OK or UNAUTHORIZED/FORBIDDEN. The user service bases it’s decisions on some knowledge it has, for example, “does the user own magazine X”. In order to feed this knowledge to the service, we also implemented an endpoint to receive notifications of specific events. At the moment we have creation and deletion of magazines but we’re planning on adding more.
 The happy path for this authentication and authorization flow works as follow:
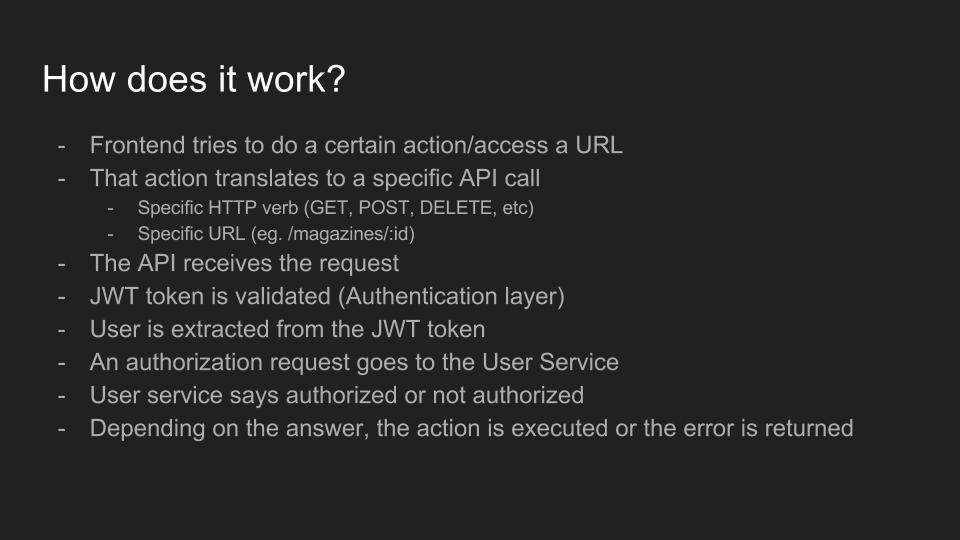
- The user tries to do a certain action like pressing a button or access a certain URL
- That action translates to an API call with a specific URL and a specific HTTP verb (eg: GET /magazines/1234)
- A request with the JWT token is made to the API
- The authentication layer intercepts the request and validates the token. If the token is valid, the request continues
- The authorization layer intercepts the request and issues an authorization query to the User Service (with an API request to the same URL and with the same HTTP verb)
- The user service matches the request to a certain policy and authorizes it (with an HTTP OK)
- The authorization layers let’s the request go through and the original API call gets served
 Below are some examples of what the code in the User Service looks like.
Main authorization class that mimicks the backend API URL structure
require "sinatra"
require "sinatra/namespace"

# Policies
OK = Proc.new { halt! 200 }

FORBIDDEN = Proc.new {
  halt! 401 unless is_loggedin?(user)
  halt! 403
}

LOGGEDIN = Proc.new { halt! 401 unless is_loggedin?(user) }

OWNS_MAGAZINE = Proc.new do
  halt! 401 unless is_loggedin?(user)
  halt! 403 unless is_owner?(user, params[:id], 'magazine')
end

# Main API for the User Service
namespace '/authorization' do
  #  Gradually add authorization for magazines
  get '/magazines', &OK # Anyone can see existing magazines
  post '/magazines', &LOGGEDIN # Needs to be logged in to create a magazine
  get '/magazines/search', &LOGGEDIN # Needs to be logged in to search for magazines

  get '/magazines/:id', &OK # Anyone can see a magazine
  put '/magazines/:id', &OWNS_MAGAZINE # Only the owner can modify a magazine
  delete '/magazines/:id', &OWNS_MAGAZINE #Only the owner can delete a magazine

  get '/magazines/:id/articles', &OK #Anyone can see the articles in a magazine
  post '/magazines/:id/articles', &LOGGEDIN # Needs to be logged in to add articles to a magazine
  delete '/magazines/:id/articles', &OWNS_MAGAZINE # Only the owner can delete the articles from a magazine

  #Close everything else
  get '*', &FORBIDDEN
  post '*', &FORBIDDEN
  put '*', &FORBIDDEN
  delete '*', &FORBIDDEN
end

# API to enquire about the magazines of a user
# and to add/remove the link user<->magazine
namespace '/users' do
  get '/:uid/:type' do |uid, type|
    json Ownership.of(uid, type).map { |o| o.oid }
  end

  put '/:uid/:type/:oid' do |uid, type, oid|
    Ownership.add(uid, oid, type)
    200
  end

  delete '/:uid/:type/:oid' do |uid, type, oid|
    Ownership.remove(uid, oid, type)
    204
  end
end

def is_owner?(uid, oid, type)
   Ownership.owns?(uid, oid, type)
end

def is_loggedin?(user)
  !user.nil? && !user.empty?
end

def is_admin?(user)
  AdminUser.is_admin?(user)
end

def user
  params[:user]
end

# Redefine halt so it checks last minute if it is an admin
def halt!(status)
  if status != 200 && is_loggedin?(user) && is_admin?(user)
    halt 200
  else
    halt status
  end
end
Ownership Class
class Ownership < Sequel::Model
  self.set_allowed_columns :uid, :oid, :type

  def self.add(uid, oid, type)
    self.find_or_create(uid: uid, oid: oid, type: type)
  end

  def self.remove(uid, oid, type)
    self.filter(uid: uid, oid: oid, type: type).destroy
  end

  def self.of(uid, type)
    self.filter(uid: uid, type: type).all
  end

  def self.owns?(uid, oid, type)
    self.filter(uid: uid, oid: oid, type: type).first.present?
  end
end
AdminUser Class
class AdminUser < Sequel::Model
def self.is_admin?(uid)
self.where(uid: uid).first.present?
end
end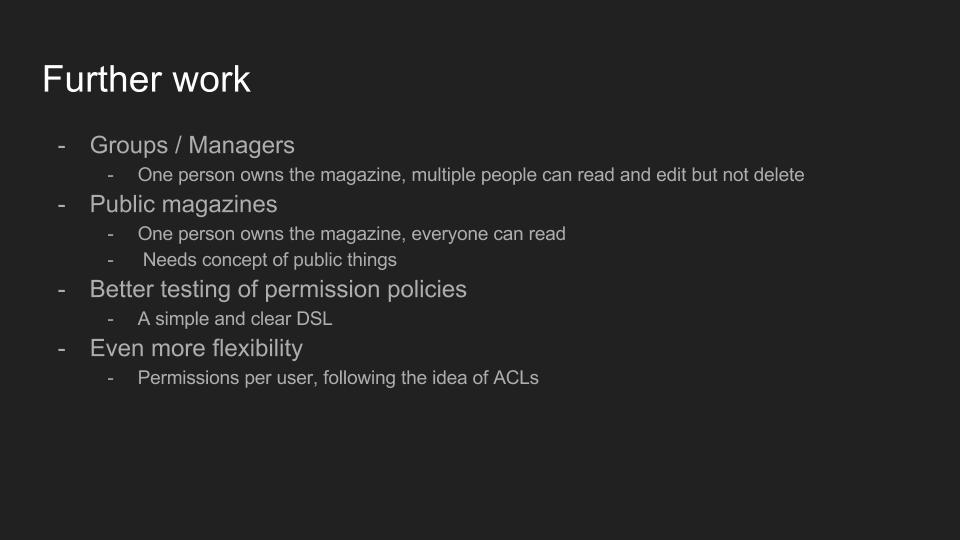 So that was just a first step. We have developed the basics of our authentication and authorization but there’s plenty more planned.
Some of the features we want to add are:
So that was just a first step. We have developed the basics of our authentication and authorization but there’s plenty more planned.
Some of the features we want to add are:
- We want to be able to support bigger organizations where there might be several people collaborating on the same magazine
- We want to support sharing magazines and private/public views of it
- There’s currently some testing of policies in the User Service but we want full coverage aswell as an easier way to write the test (potentially implementing our own DSL)
- If at some point we find ourselves in need of more flexibility, one idea would be to implement the concept of Access Control Lists (ACLs) where policies are associated to each user instead of a couple of policies users fall into.
That’s it for this post. Feel free to contact me if you have any questions and check out Horizons to see all this in action.